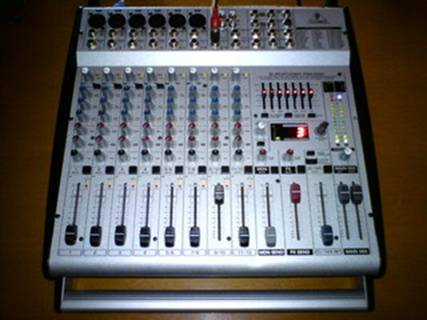
Behringer Europower PMH1000
repair/popravilo
![]()
![]()
PMH1000
Repairing the
powerend/popravilo končne stopnje
Zaradi
dotrajanosti ali slabega vzdrževanja,izpostavljanja tekočinam,transporta itd..se
nam lahko večkrat zgodi da odpove kakšen elektronski element. Naprava ne deluje
pravilno,v zvoku ch.A slišimo prasketanje.
Due to expire
or poor maintenance, exposure to liquids, transport, etc. .. we may
happen several times to faul the
electronic element. The
device does not work properly, in sound of ch.A we
hear crackling.
Previdno
odvijemo pokrov in ga odstranimo na varno. Odvijemo tudi vijake na zadnji
strani ohišja.
Carefully unscrew the cover and remove it to safety. Unscrew the screws on the back side of panel, too.


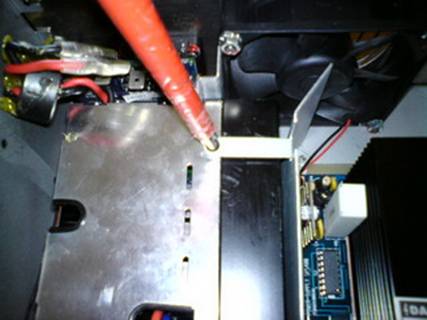
Odstranimo vezje z ohišja da lahko dostopamo do elementov
na vezju. Bodimo
previdni pri demontaži vijakov na s spodnji strani ohišja. Na koncu odvijemo
tudi zaščitno ohišje ojačevalne stopnje.
Remove the
circuit board from the housing
in order to access the elements in the circuit. Be
careful when removing the screws
on the underside of the housing.
In the end, unscrew the protective
housing of amp stage.


Označimo sponke za priklop zvočnikov in iztaknemo kontakte da bomo lahko dostopali do vezja končne stopnje. Ker bomo izvedli meritve signalov na mešalni stopnji moramo preveriti če so prisotne vse napetosti.
Mark the terminals for
connecting the speakers and put
out the contacts
that we can
access the circuit output stage. As we will
carry out the measurement signal to the mixing stage,
we have to check if they
are present all voltages.


Ko smo
ugotovili (main out na
mešalki) slika 14, da sta signala nepopačena se osredotočimo na vezje končne
stopnje. Preverimo vse točke signala do končnega IC-ja, sledimo popačenemu
signalu na ch.A.
When we
found out (main out on the
mixer) Figure 14 that the signal is undistorted let's focus on circuit output stage. Check
all points of the signal to the final IC, follow
the fault(distorted) signal in ch.A.


Opazimo popačen
signal na IC2 (NJM4580) na izhodu
We Observed
noisy signal to IC2 (NJM4580) to output
7 and 1. Since this is a crackling noice,we suspect
the problem of dynamic component circuits, ceramic capacitors. Carefully replace all the
capacitors Figure 15, carefull
with pcb.


Ko smo
preverili delovanje naprave in ugotovili, da vse deluje pravilno napravo
sestavimo v nasprotnem zaporedju kot smo jo razstavili. Z vročim lepilom
pritrdimo žičke na ohišje.
When we
checked the operation of the
device and found that everything is working properly assembled device in the reverse order as we have it disassembly.
With hot glue fix the
wires to the chassis..

Na napravo
priključimo več različnih signalov in frekvenc. Primerjamo izhoda ch.A in ch.B če delujeta enako.
Dodamo breme 4E na izhod in lahko izmerimo tudi največjo moč in popačenje.
Connect to the
device over various signals and frequencies.
Comparing the output ch.A and
ch.B if they
operated in the same way. With added
dummy load 4E on output,we can
measure the maximum power and
distortion.


Slika 14/Picture 14 Slika 15/Picture 15 Slo navodila/Slovenian manuals

Opozorilo:AudioLogs ne odgovarja,za morebitne
napake med postopkom ali za škodo ki se lahko zgodi. Preden se lotite popravila
izključite aparat iz omrežja. S posegom v aparat lahko poškodujete vezje. Bodite
previdni pri popravilu vezja ,ker lahko poškodujete ploščo tiskanega vezja in
povezave. Če tega posega niste vešči naj za vas to opravi strokovnjak.
Warning: AudioLogs is not responsible, for the errors during the procedure or damage that may occur. Before you start to repair,plug
out unit from the network. By intervening in unit could damage the circuit. Be careful when you repairing
the pcb, you
can damage the pcb. If you are not skilled in this practice
should be done for you an expert.
AudioLogs,March2014,info@audiologs.com
If the information was useful for you, you can