Vse o Mackie DXB200 in še več/ALL about mackie DXB200
and more
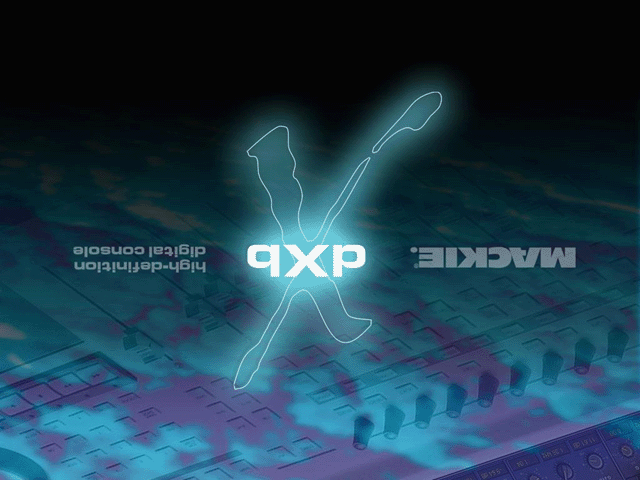
Mackie
DXB200

![]()
![]()
-poglejmo v notranjost
-getting inside
-kako popraviti matično ploščo -how to repair motherboard
(mobo)
-popravilo napajalnika -repair the power supply
-nastavitev Bios (Iwill,Super
micro matična plošča) -Bios settings
(Iwill, Super Micro mobo)
-HD varnostna kopija -HD backup
-vgradnja in nastavitev Bios-a Asus matična plošča -installation
and setup BIOS Asus mobo
-kako izdelati Bios Logo za matično plošče -how to design Bios Logo for mobo
-popravilo drsnega potenciometra -fader-repair
-konfiguracija in nastavitev
mešalne mize -configuration
and setup console
To je naprava, ki nam omogoča, da lahko tudi kot
končni uporabnik aktivno spreminjamo, dodajamo in sami posegamo v izdelek ki
smo ga kupili. Poglejmo v notranjost digitalnega mixerja digital X bus in si
oglejmo kako je sestavljen in kako lahko določene sestavne dele odvijemo, kako
jih zamenjamo, popravimo, dodamo in spreminjamo. Kliknimo na povezavo:
This is
a device that allows us end-user to be as actively changing, add themselves
serviced in the product that was purchased. Let's look at the inside of the
digital mixers Digital X Bus and let's look at how is composed and how can
certain elements be unscrewed, how to replace, repair, add, and change it.
Click on the following link:

Mackie
DX200 start video -link
Mešalno mizo damo na večjo površino,da lahko
varno ravnamo z njo. Odvijemo tudi vijake na zadnji strani ohišja.
We have to place mixer on a larger surface, that we can safely
handle it. Unscrew the screws at the rear of the casing.


Previdno
odstranimo notranji del nosilca z matično ploščo in diskom in ga damo na
posebno mesto. Na matični zamenjamo napihnjene kondenzatorje z novimi morajo
imeti enako vrednost.
Carefully
remove the part of the carrier with a motherboard (mobo) and a disk and put it
to a special location. On the motherboard (mobo) replace inflated capacitors
with new,they must have the same value.


Ko imamo
že odprto ohišje lahko progledamo tudi ostale komponente. Enako preverimo
grafično kartico. DXB uporablja grafiko Ati Radeon 9200. Če imamo vstavljene
ostale kartico kot so npr.firewire,preverimo še te.
When we
have an open housing may also chesk other components. We can check the video
card,also. DXB is using graphics ATI Radeon 9200. If you have inserted other
cards as for example firewire, check these also.


Zaradi dotrajanosti ali morebitnih napak omrežja se lahko
zgodi da odpove napajalnik,mixer ne štarta. Potrebno je zamenjati napajalnik. Uporabimo
lahko 600W pro ATX napajalnik.
Due to
wear or any network errors can happen to fault the power supply, the mixer does
not start. It is necessary to replace the power supply. We can use pro 600W ATX
power supply.


Pazimo
da pravilno priključimo vse konektorje,glavnega in 12V 4 pin na matično ploščo
ostale pa na power supply board (Power Interconnect)
Take
care to properly connect all the connectors, general and 12V 4 pin on the
motherboard (mobo) remain connectors connect to the power supply board (Power
Interconnect).


Bios
(BasicInputOutputSystem) je kot firmware na matični plošči. Temeljni na vhodno-izhodni
sistemu in je programska oprema, ki se nahaja v flash spominu zraven ROM-a ki se
izvede takoj po vklopu osebnega računalnika (PC). BIOS omogoča nastavitve
osnovnih parametrov strojne opreme in njeno testiranje ter nalaganje
operacijskega sistema ali zagonskega nalagalnika. BIOS ostane aktiven tudi ko
je operacijski sistem že naložen. Služi kot vmesnik med strojno opremo in
operacijskim sistemom. Tako lahko isti operacijski sistem deluje na različnih strojnih
opremah. BIOS omogoča operacijskemu sistemu in ostali programski opremi dostop
do strojne opreme oziroma delo z njo. Ob prvem zagonu ima BIOS tovarniške
(privzete) nastavitve. Uporabnik osebnega računalnika si lahko nastavitve
prilagodi svojim potrebam in svoji (dodatni) strojni opremi. Če želimo
spreminjati nastavitve, moramo v zelo zgodnji fazi zagona pritisniti ustrezno
kombinacijo tipk (običajno F2, Delete/Del ...). BIOS se lahko tudi posodablja.
Posodobitve običajno najdemo na spletni strani proizvajalca ali pa jih naredimo
sami,kot bomo videli v delu kjer sami programiramo Asus mobo. Baterija na
matični plošči služi za pomnjenje ure, datuma in nastavitev. To pomeni, da če
se baterija sprazni, se trenutne nastavitve v BIOS zbrišejo (zgubijo) oziroma
se vrnejo na tovarniško ali naše nastavljene vrednosti.
BIOS
(Basic Input Output System) is as firmware on the motherboard. Base to the
input-output system and the software that is located in the flash memory
close-ROM to be carried out immediately after turning ON a personal computer
(PC). BIOS is configure the basic parameters of the hardware and its testing
and load the operating system or boot loader. BIOS remains active even when the
operating system is loaded. It serves as an interface between the hardware and
the operating system. So, the same operating system running on different
hardware. BIOS allows the operating system and other software access to
hardware and work with it. When you first launch the BIOS factory (default)
settings. PC user can adjust the settings to your needs, and its (optional)
hardware. If we want to change the settings, we have a very early stage startup
to press a key combination (usually F2, Delete / Del ...). BIOS can also be
updated. Updates are usually found on the manufacturer's website or make them
yourself, as we'll see in the part where will be programm Asus mobo by ourself.
The battery on the mobo is used for memorizing the time, date and settings.
This means that if the battery power, the current settings in the BIOS are
erased (lose) or returned to the factory or our setpoints.


Če
želimo naše nastavitve spremeniti moramo pri nekaterih ploščah fizično vzeti
BIOS čip iz podnožja in ga preprogramirati na programatorju. To storimo tako,
da s posebnimi klešči vzamemo bios flash chip iz podnožja.
If we
want to change our settings we have to from some mobos physically take out the
BIOS chip from the socket and reprogram it to programmer. This is done so that
with the special pliers take bios flash chip from the socket.

BIOS čip
postavimo v podnožje programatorja s katerim bomo preprogramirali naš čip po
naših nastavitvah. Upoštevati moramo oznako na BIOS čipu ter tako nastaviti
programator. Datoteke imajo končnico .ROM ali .BIN.
Put the
BIOS chip in the socket of programmer which will reprogrammed our chip according
to our preferences. We have to take care sign on the BIOS chip and set the
programmer. Files have the extension .ROM or .BIN.


Preden
začnemo z nastavitvami ali prepisom BIOS-a je najbolje da preverimo kateri čip
oziroma katero verzijo BIOS-a imamo.To storimo s programom Biosagent. Ugotovili
bomo tudi hitrost procesorja,koliko imamo inštaliranega RAM-a in kateri Chipset
imamo.
Before
we start with the settings or a rewrite of the BIOS, it is best to check which
chip we have, which version of BIOS we have. We can do this with the program
Biosagent. We will determine the speed of the processor, how many RAM have the
installed, and what Chipset we have.

Prenesimo
- BiosAgent.zip
Dovnload
- BiosAgent.zip
Award
Bios Editor je orodje ki ga bomo uporabljali za editiranje BIOS-a in sicer za
IwillP4SE mobo ali podobno. Ima award (Phoenix)BIOS čip set. Spreminjamo lahko
nastavitve kakor tudi splash screen. Bitna oblika slike *.bmp
ni enaka
kot pri win(XP) formatu,zato jo bomo morali spremeniti,kako bomo videli
kasneje.
Award
Bios Editor is a tool that we use for editing the BIOS IwillP4SE mobo or similar. It has Award
(Phoenix) BIOS chip set. We can change the settings as well as the splash
screen,too. The bitmap image format *.bmp
It is
not the same as with a win (XP) bmp format,so we need to change,how we'll see
later.

Prenesite
-
AwardBiosEditor.zip (vključuje nastavitve za ploščo in logo DXB200)
Download
-
AwardBiosEditor.zip (includes settings panel and logo DXB200)
Sedaj
pride na vrsto naše orodje za izdelavo BIOS bmp sličic (splash). Uporabili bomo
Awbmtools. To sta orodji AWBM2TIFF and TIFF2AWBM za
pretvorbo sličic iz tiff formata v bmp BIOS format.
Za BIOS splash lahko izdelamo tudi svojo sličico. V
*.zip datoteki so vsa navodila za izdelavo sličic in »free« programa za izdelavo
le-teh.
Now comes our tool for making BIOS bmp picture
(splash screen). We will use Awbmtools. These are the tools AWBM2TIFF and
TIFF2AWBM to convert TIFF format images to the BIOS bmp format.
For BIOS splash can make your own picture . The *
.zip file contains all the instructions for creating thumbnails and
"free" program for the production thereof.
Prenesite -
awbmtool-bios-logo.zip (vključuje že pripravljeno splash sličico za BIOS)
Download
-
awbmtool-bios-logo.zip
(includes ready splash thumbnail BIOS)
Če imate
svoje orodje za izdelavo sličic si lahko prenesete samo splash sličico.
If you
have your own tool for making BIOS splash screen you can download only the
splash picture.
Prenesite
- Mackie.bmp
Download
- Mackie.bmp
AWDflash
disketa je orodje za prepis in nastavitev BIOS z diskete. Torej BIOS lahko
preprogramirate kar z diskete. Potrebujete 1.44Mb disketo in disketnik (FDD).
Orodje je zelo enostavno za uporabo in odlično deluje.
Uporabljate
ga lahko za SuperMicroP4 mobo in tudi za IwillP4SE mobo. Najprej preverite če
ima mobo award BIOS. Navodila najdete v *.zip datoteki,vsebuje tudi BIOS *.bin
datoteko za mobo IwillP4SE1104.
AWDflash
floppy disk is a tool for trewrite BIOS settings from a diskette. So you can reprogram
the BIOS from disketee. You will need a 1.44Mb floppy disk and floppy disk
drive (FDD). The tool is very simple to use and works great.
You can
use it for SuperMicroP4 mobo and also IwillP4SE mobo. First, check if the MOBO has
Award BIOS. Instructions can be found in * .zip file containing the BIOS * .bin
file for mobo IwillP4SE1104.

Prenestite
-
Bios-FLASH-disketa
Download
-
Bios-FLASH-disketa
CBROM je
podobno orodje kot awdflash za award BIOS set in je za DOS prompt okolje.
CBROM
similar tool as awdflash for awardBIOS set and it runs at a DOS prompt.
Prenesite
- CBROM-BIOS-logo
Download
- CBROM-BIOS-logo


Če imate
SuperMicro mobo lahko enostavno prepišete BIOS set kar iz datoteke *.txt.
Prenesite
-
Bios-Set-Mackie-SuperMicro.txt
Download
-
Bios-Set-Mackie-SuperMicro.txt
Če ne
želimo izgubiti podatkov,ki so na trdem disku,ali če se nam pokvari trdi disk
(HD) je najbolje da si ustvarimo varnostno kopijo.Odvijemo ohišje in odstranimo
HD.
If we do
not want to lose the data on our hard disk, or the hard disk (HD) failure, it
is best that you create a backup copy. Unscrew the housing and remove the HD.


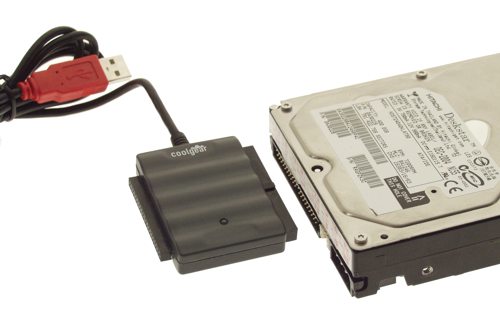
Najbolje
da uporabimo USB2IDE adapter zgleda takole (USB2IDE.jpg) . Nanj
priključimo HD na katerega želimo prenesti vsebino sistemskega diska C: iz
mešalne mize DXB200.
It is
best way to use USB2IDE adapter looks like this (USB2IDE.jpg) . Connect
the HD which you want to transfer content from the system drive C: from mixers
DXB200.


HD na
katerega bomo prenesli backup vsebino najprej formatiramo v win(xp). S tem tudi
preverimo če je HD izpraven. S programom XXClone je brezplačen,najdemo na ga netu,kloniramo
vsebino C: DXB200.
HD which
data will be transferred for the backup,formatted first with win (xp). This procedure
will also check if the HD works properly . With freee XXClone program can be
found on the net, clone the contents of C: DXB200.


Če
želimo da bo DXB200 deloval z ploščo ASUS oziroma deloval pravilno moramo imeti
svojo verzijo BIOS podatkov. Drugače DXB ne bo deloval. Za BIOS vsebino prosim
kontaktirajte info@audiologs.com.
Pri
uporabi ASUS mobo imamo nekaj dodatnih prednostni. ASUS mobo imajo že dodan
programček za win (XP) s katerim lahko programiramo BIOS kar iz Operacijskega
sistema. Uporabili bomo program ASUS update.
If you
want to DXB200 works with the ASUS board or function properly you need to have
its own version of the BIOS data. Otherwise DXB will not work. For the BIOS
content, please contact info@audiologs.com.
When
using ASUS mobo we have some additional priority. ASUS mobo have been added to
the applet for win (XP) which can be programmed BIOS from your operating
sistema. We will use ASUS update program.


Odpremo
zavihek s programi in zaženemo program ASUS update. Ko se nam pojavi okno
izberemo naš BIOS-Mackie.ROM (s katerim bomo prepisali obstoječi tovarniški
bios). To nam omogoča da bo DXB200 deloval pravilno.
Tab of
the program and run the program ASUS update. When a window appears select our
BIOS Mackie.ROM (which will overwrite the existing default bios). This allows
us to DXB200 function properly.


Ko smo
izbrali našo BIOS datoteko jo pripravimo za prepis v BIOS rom. Ko je datoteka
izbrana, se začne postopek vpisa v ROM. Zapis je trajen , ampak čip je flash
prepisljiv. Če pride do napake, se lahko poškoduje vsebina
BIOS
čipa,čipa ne moremo poškodovati. Če pride do poškodbe vsebine, mobo ne bo
štartala,morali ga bomo preprogramirati s programatorjem. Pazimo da pri
postopku ne zmanjka napajanja.
When we
chose our BIOS file prepared it for a write of the BIOS ROM. When the file is
selected, the process of ROM begin. The write is permanent, but the chip is
rewritable flash. If an error occurs,the content BIOS chip
can be
damaged,the chip can not be damaged. If damage to the contents of the mobo will
not start, we will have to reprogram it in the programmer. Take care during the
process,runing out of power.
 BIOS-Mackie.ROM also included the
bios logo of mackie start splash
BIOS-Mackie.ROM also included the
bios logo of mackie start splash
Če
želimo ob vklopu DXB200 imeti svoj logo,ga lahko vpišemo v splash BIOS ekran.
Program prepozna različne formate slik in jih pretvori v obliko za BIOS. V delu
za SuperMicro in I wil mobo smo morali to storiti sami.
If we
want to have at power ON DXB200 ourown logo, we can write it to the splash BIOS
screen. The program identifies various images and converts them into a format
for BIOS.
In part
for Supermicro and I wil mobo we had to do it ourself.


Izberemo
svoj logo za splash v resoluciji 640x480 (Vga) in štartamo ASUS program MyLogo.
Dobimo ga zraven ASUS mobo.
Pick
your logo to splash in the resolution of 640x480 (VGA) and start ASUS MyLogo
program. It is included by the ASUS mobo parts.


Ko smo
izbrali svojo datoteko,katero želimo imeti za začetno sliko ob vklopu DXB200 jo
pripravimo za vnos v BIOS. Program bo tudi prepoznal BIOS in nam pretvoril
sliko v pravilno obliko.
When we
select our file, which we want to have the initial startup screen DXB200
prepared for write into the BIOS. The program will also recognize the BIOS and
a converted image in the correct format.
Ko smo
vse preverili se odločimo za vpis,to je funkcija flash. Med vpisom v BIOS flash
lahko opazujemo kako se bios najprej sprazni in nato prepiše z našo vsebino.
Vsebino si lahko shranimo tudi za arhiv.
When we
all checked,we decide to write, this is a function flash. During writing into
the BIOS flash we may observe how the BIOS first erased and then overwritten
with our content. The content can be stored for archive.


Prenesite
si orig. sliko za splash ekran - Mackie.bmp
Download
orig. picture for Splash screen - Mackie.bmp
Prenesite
Logo Asus Mackie -
LogoAsusMackie.bmp
Download
Logo Asus MAckie -
LogoAsusMackie.bmp
Ko smo
ugotovili da pri kalibraciji ob vklopu fader zaostaja ali pa sploh ne deluje ga
bomo popravili,zelo enostavno. Najprej odvijemo ohišje s spodnje strani. DXB200
položimo na bok.
When we
find out during the calibration,at power ON fader lags or does not work,we will
repair it,very easily. First unscrew the housing from below. DXB200 have to lay
on its side.


Ko
pridemo do fader-jev, iztaknemo sponke za priklop in na zgornji strani še
odvijemo torx vijak. Za fader si pripravimo delovno površino.
When you
get to the faders, put out the terminal for connection and on the upper side
unscrew the Torx screw. For fader you have to prepare the work surface.


Previdno
začnemo s popravilom in izmaknemo spodnje zatiče z malim izvijačem. Vse zatiče enako
da dobimo plastični del fader enakomerno iz kovinskega ohišja.
Carefully
begin to repair and put out the lower pins with a small screwdriver. All
latches at the same time to get the plastic part of fader evenly from the metal
housing.


Previdno
odmaknemo kovinsko ohišje. Pri pregledu fader-ja bomo ugotovili da je vtrgana
vrvica. Fader nima grafitnega drsnika,ampak deluje s pomočjo vrvice katero
premika motorček ali jo premikamo ročno.
Deluje
na principu IR led diode,ki daje impulze. S premikom osi motorčka prekinjamo
svetlobo in tako generiramo impulze. Za začetno in končno pozicijo je pred
uporabo fader-ja potrebna kalibracija.
Carefully
move away metal casing. When reviewing the fader we find broken twine. Fader
does not has the graphite slider, but works through the twine which moves the
motor, or can be moved manually.
It works
on the principle of infrared LEDs, which gives impulses. By moving the axis of
the motor interrupt light and that generate impulses. For the initial and final
position before use,fader have to be calibrated.


Enostavno
navijemo novo vrvico(nit) z naše domače uporabe za šivanje. Vrvica je lahko
povoskana,da ne drsi in da je dovolj homogena in se ne cefra. Pazimo da se
vrvica lepo navije na os motorčka.
Simply
wrap the new string (thread) from our domestic sewing accessories. The hread
can be waxed,for non slip and that it is sufficiently homogenic to not tear to
pieces. Take care the thread is neatly round on the axis of the motor.


Ko smo
navili vrvico, jo na koncu pritrdimo na srednji del faderj-ja. Zataknemo jo v
zatič in ga pritisnemo skupaj. Ko smo testirali delovanje zgornja in spodnja
točka, sestavimo fader bo obratnem vrstnem redu.
When we
wrapped the thread we end up attached to the middle part of the fader. Thread
stuck to the pin and press it together. When we tested the operation of the
upper and lower point, assembly the fader with reverse order.


Pri BIOS
nastavitvah bilo katere mobo bodimo previdni na vklopno funkcijo. To pomeni da
se mobo zažene vedno po vklopu glavnega stikala ON/OFF in ne dodatnega
stikala,kot je na nekaterih PC ohišjih.
To
dosežemo z funkcijo »restore on AC power Loss« ta funkcija naj bo vedno
vklopljena,pri vseh mobo-ih.
After
the BIOS settings panel any of mobo be careful to turn ON function. This means
that the mobo always starts after turning ON the main switch ON / OFF, and no
additional switch, such as a certain PC housings.
This is
achieved by using the "Restore on AC Power Loss", this function
should always be switched on at all mobos.


Pri
konfiguraciji mobo bomo potrebovali tudi določene datoteke. Najprej si oglejmo
navodilo za inštaliranje OS (operacijskega sistema). Ko kliknemo na sliko se
nam odpre pdf datoteka. Naslednja je SW inštalacija za XP uporabnike.
DAW
funkcija je povezljivost in kontrola digitalne avdio naprave.UAD je inštalacija
Plug inov in vodič.
In the
configuration mobo you will also need certain files. First, let's instruction
how to install the OS (operating system). When we klick the image we open a pdf
file. Next SW installation for XP users.
DAW
feature connectivity and control digital audio devices. UAD the installation
Plugins and guide.


Prenesite
OS Digitalxbus_1.2.2
ali Digitalxbus_1.2.10
(datoteka.zip,sledite .pdf datoteki,inštrukcijam kako naložiti OS)
Download
OS Digitalxbus_1.2.2
or Digitalxbus_1.2.10
(.zip file, follow the .pdf file Instructions how to load OS)
Oglejte
si novo verzijo OS V2.0.1 na strani dxb200.masterout.it
(izboljšana verzija OS in rešeni bug-i)
Check
the new version of OS
V2.0.1 on page dxb200.masterout.it (an
improved version of the OS and resolved bugs)
Oglejmo
si tudi kako je DXB200 možno priključiti v »Hookup Diagrams« in kakšne
konektorje potrebujemo za avdio signale. Vključeni so tudi DB25 konektorji.
See also
how DXB200 can be connected to "Hookup Diagrams" and what connectors do
we need for audio signals. Including DB25 connectors.


V FAQ
datoteki bomo našli odgovore na,ki se nam postavljajo ob uporabi mešalne mize.
Vse o uporabi DXB200 pa najdemo v datoteki »owner's manual«.
The FAQ
file we'll find the answers how to make the presets and mixer using. All about
how to use DXB200 is found in the file "owner's manual".


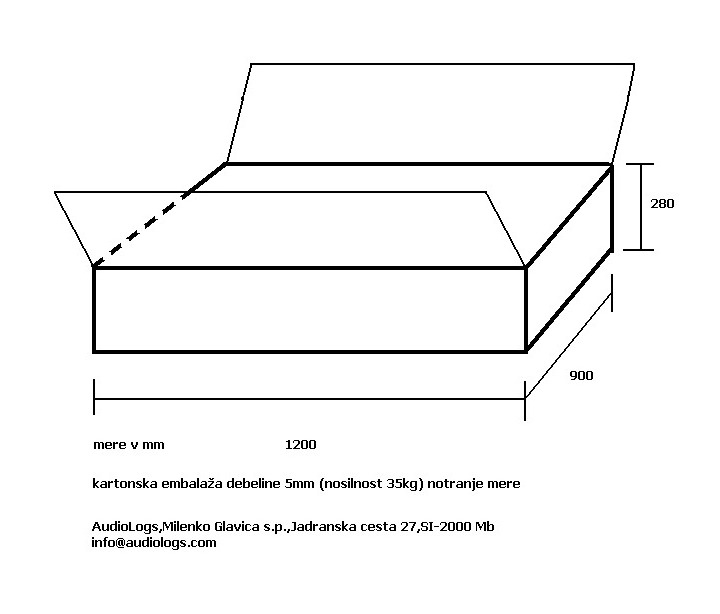
Pri
prenosu ali pošiljanju ne pozabimo na dobro embalažo. Tukaj so mere kartonaste
embalaže in mere DXB200.
When
transferring or sending the item not forget the good packaging. Here are the
dimensions of carton packaging and dimensions DXB200.


Opozorilo:AudioLogs ne odgovarja,da
ne bo prišlo do napake med postopkom ali za škodo ki se lahko zgodi. Preden se
lotite popravila izlključite aparat iz omrežja. S posegom v aparat lahko
poškodujete vezje. Bodite previdni pri prepisu BIOS-a,ker lahko poškodujete
matično ploščo. Če tega posega niste vešči naj za vas to opravi strokovnjak.
Warning: AudioLogs is not responsible, that there will be no errors during the procedure or damage that may occur. Before you start to repair,plug out unit from the network. By intervening in unit could damage the circuit. Be careful when flashing BIOS because they can damage the motherboard. If you are not skilled in this practice should be done for you an expert.
AudioLogs,April
2016, info@audiologs.com
If the information was useful for you, you can